Imagine a chess game where you have a equal material as your opponent, then, suddenly, with couple of moves, they trap you. Now, no matter what you do, your position gets worse. You’re not in check, but every legal move you make leads to a disadvantage. This is the paradoxical and powerful situation known as zugzwang.
Derived from German, where “Zug” means “move” and “Zwang” means “compulsion,” zugzwang literally means “compulsion to move.” It’s a defining feature of turn-based games like chess because you can’t just skip your turn. A player in zugzwang is at a disadvantage because they have to move. If they could pass, they’d be fine, or even winning. This is what separates zugzwang from a simple losing position.
Use of Zugzwang in Endgame
While zugzwang can pop up anywhere, it’s most common and decisive in the endgame. With fewer pieces on the board, every move matters more. The kings and pawns become powerful pieces, and their positions are often the key to victory.
One of the most basic examples involves a king and a pawn against a lone king. If the defending king is directly in front of the pawn, the game might be a draw i.e. opposition. But if the attacking king can get into a specific position, it can force the defending king to move away from the pawn, allowing it to advance and become a queen.
A more advanced technique to achieve zugzwang is triangulation. This is a clever way to “waste” a move by moving your king in a triangular path, returning to the same square but with the opponent now on the move. This shifts the burden of having to make a move to your opponent, often putting them in zugzwang.
Example of Zugzwang – White to play

This position looks like a draw since both of the players have equal material but in reality, white is totally winning. However, you have to choose precisely which piece to move and where to move. One little mistake can snatch the game from you.
If you thought about moving the c3 pawn, it loses the game right away because b5 pawn captures it and connects black pawns with a strong king support.
If you play Kd4, then it is the right move since it makes your opponent’s king to leave the key squares either e5 or c5 and white king can easily hop in with a guaranteed capture.
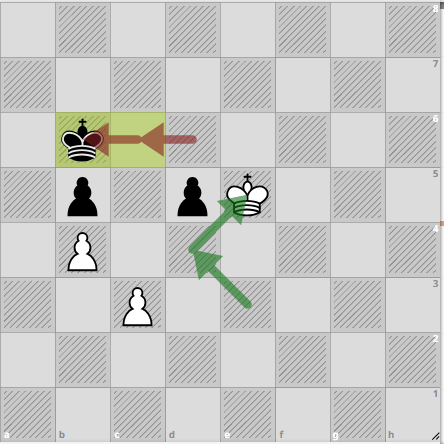

Once white captures d5 pawn, it will force black king to move further away as shown above. In the last image, white only has to play Kc5 and black will have no legal moves left but to break the support to b5 pawn and let white captures it.
A Famous Example: The Immortal Zugzwang Game
One of the most famous examples of zugzwang occurred in a game between masters Friedrich Saemisch and Aron Nimzowitsch in 1923. Nimzowitsch found a brilliant move that left Saemisch’s pieces so tangled that any move he made would lead to a losing position…
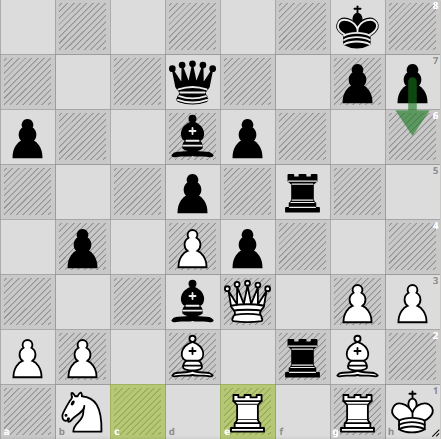
That brilliant move put White in a position where they had no good moves left. If White moved their king to h2 or a pawn to g4, Black’s rook on f5 would move to f3, and White would be in trouble. No matter what, White will eventually have to make a move that loses the game.
This is a rare moment because zugzwang usually occurs in the endgames rather than in the middle game. This shows how zugzwang can be a devastating psychological and positional weapon, even in the middlegame with many pieces still on the board.
Understanding zugzwang isn’t just about memorizing a definition. It’s about developing a feel for the game’s positional distinctions and such ability where you can easily detect your opponent’s vulnerabilities
Next time you’re in an endgame, watch for zugzwang. Try to control the center with your king to restrict your opponent’s moves. The best way to get better at this is to practice and develop your pattern recognition. For more tips, follow The New England Chess School and participate in our tournaments. Happy learning!